设置DX连接 - II
创建 Transit 虚拟接口
接下来我们将创建一个 Transit VIF。
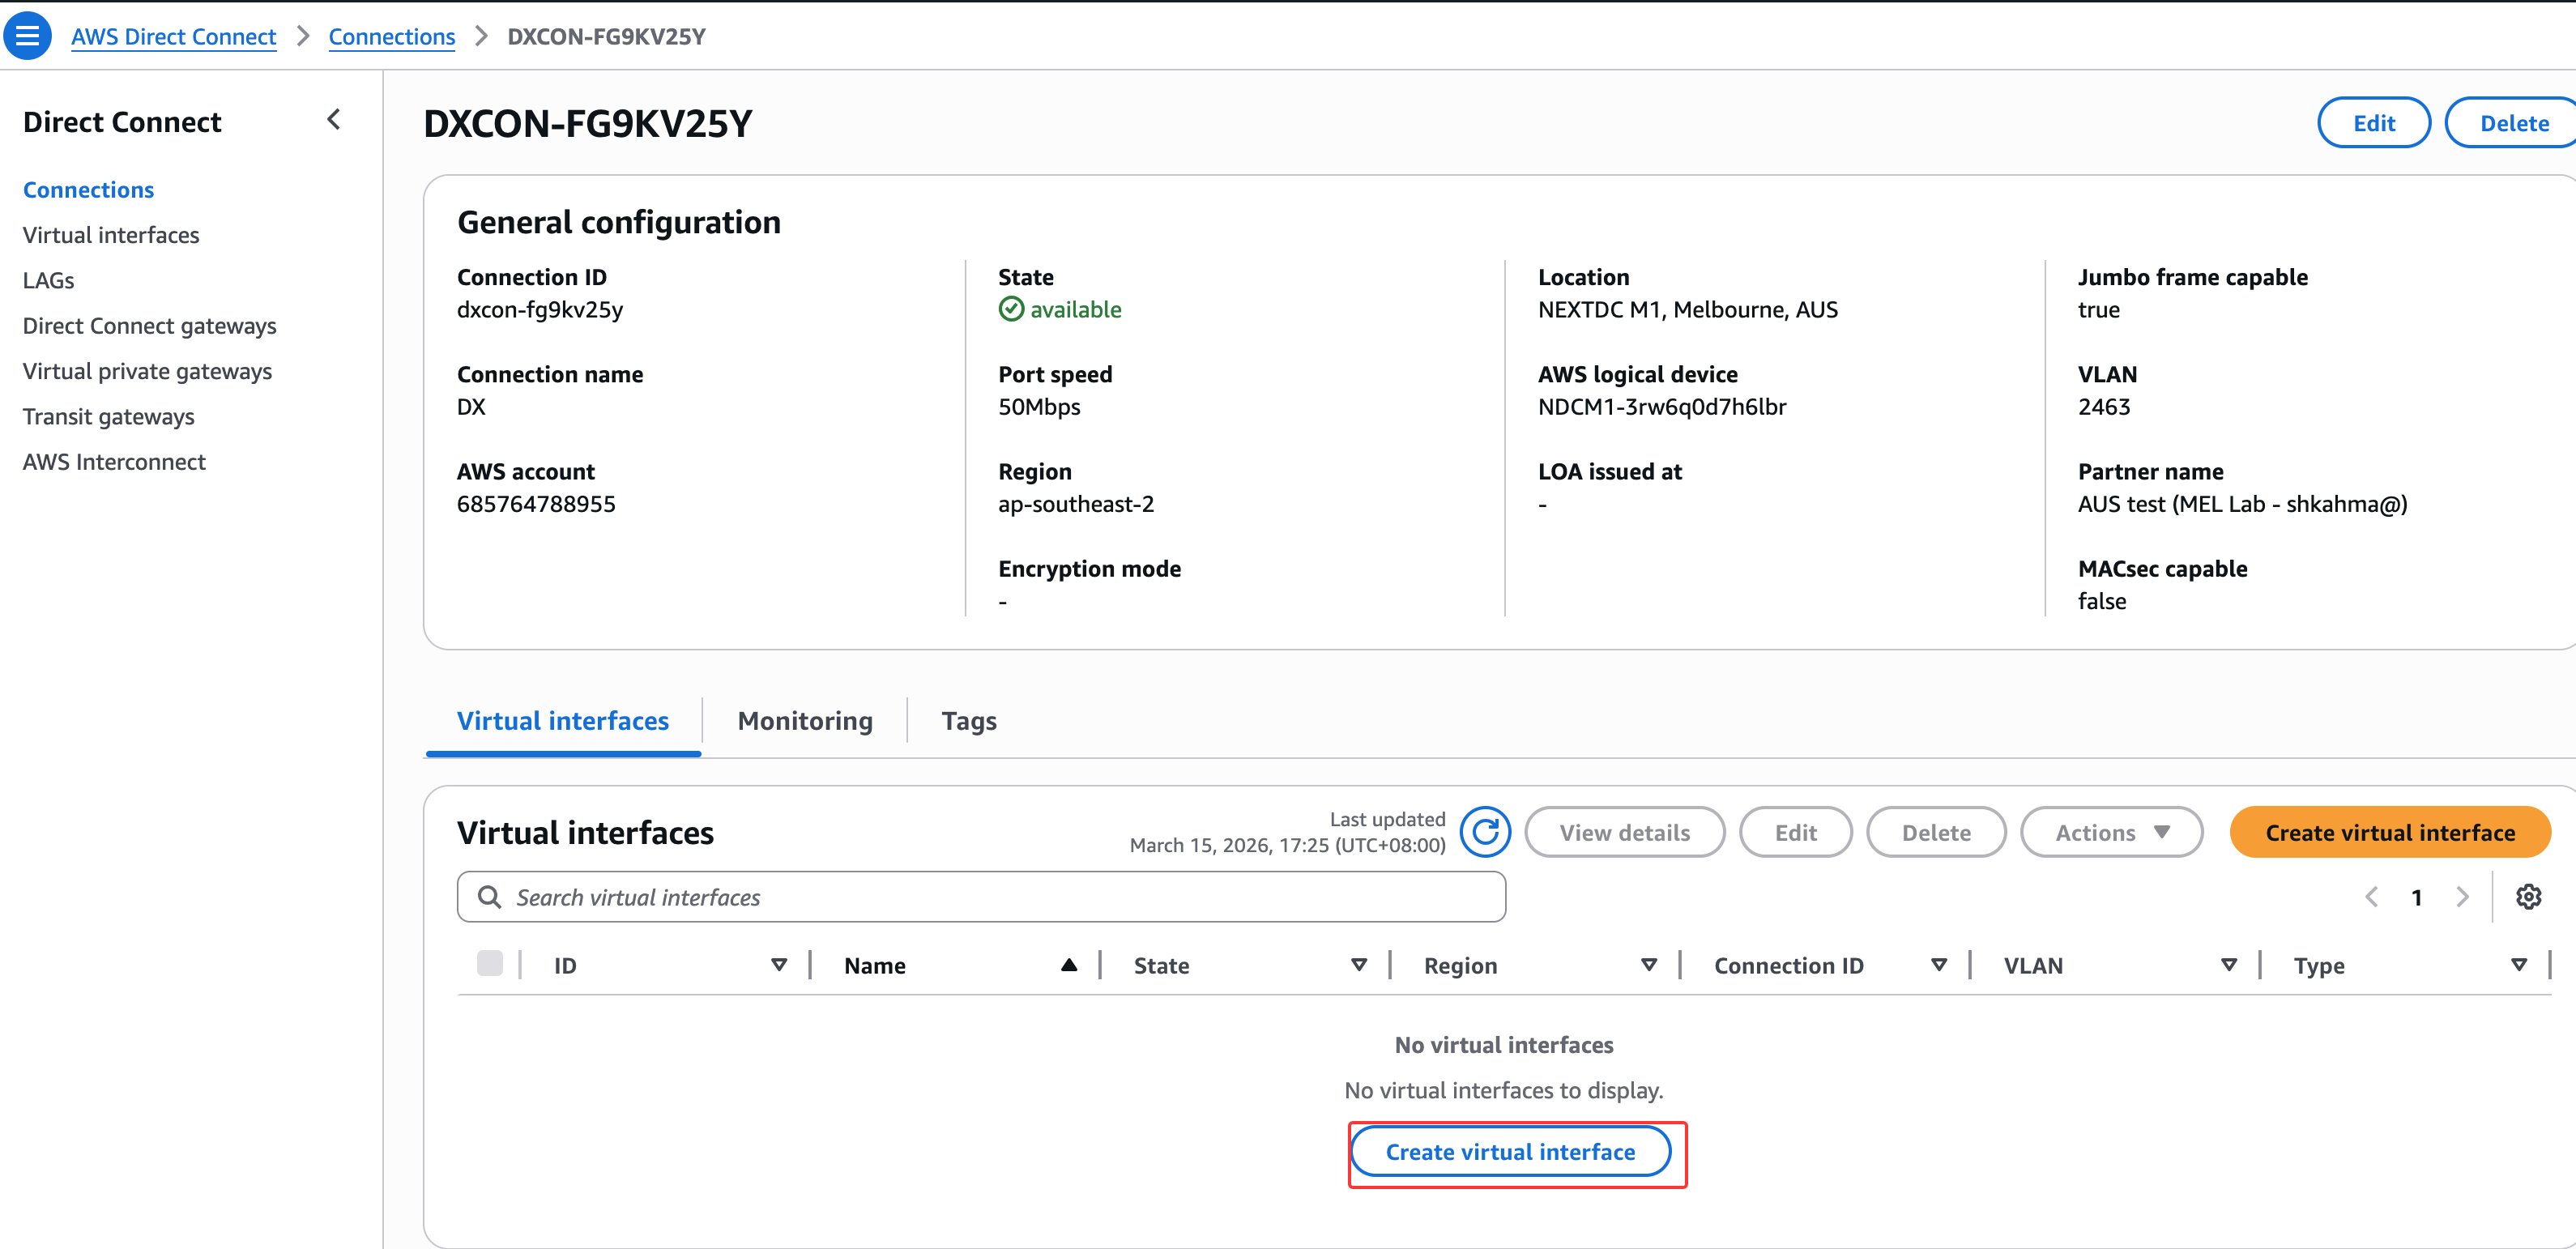
在 Virtual Interfaces 详细信息窗格中,点击 Create virtual interface。
为新VIF指定以下选项设置:
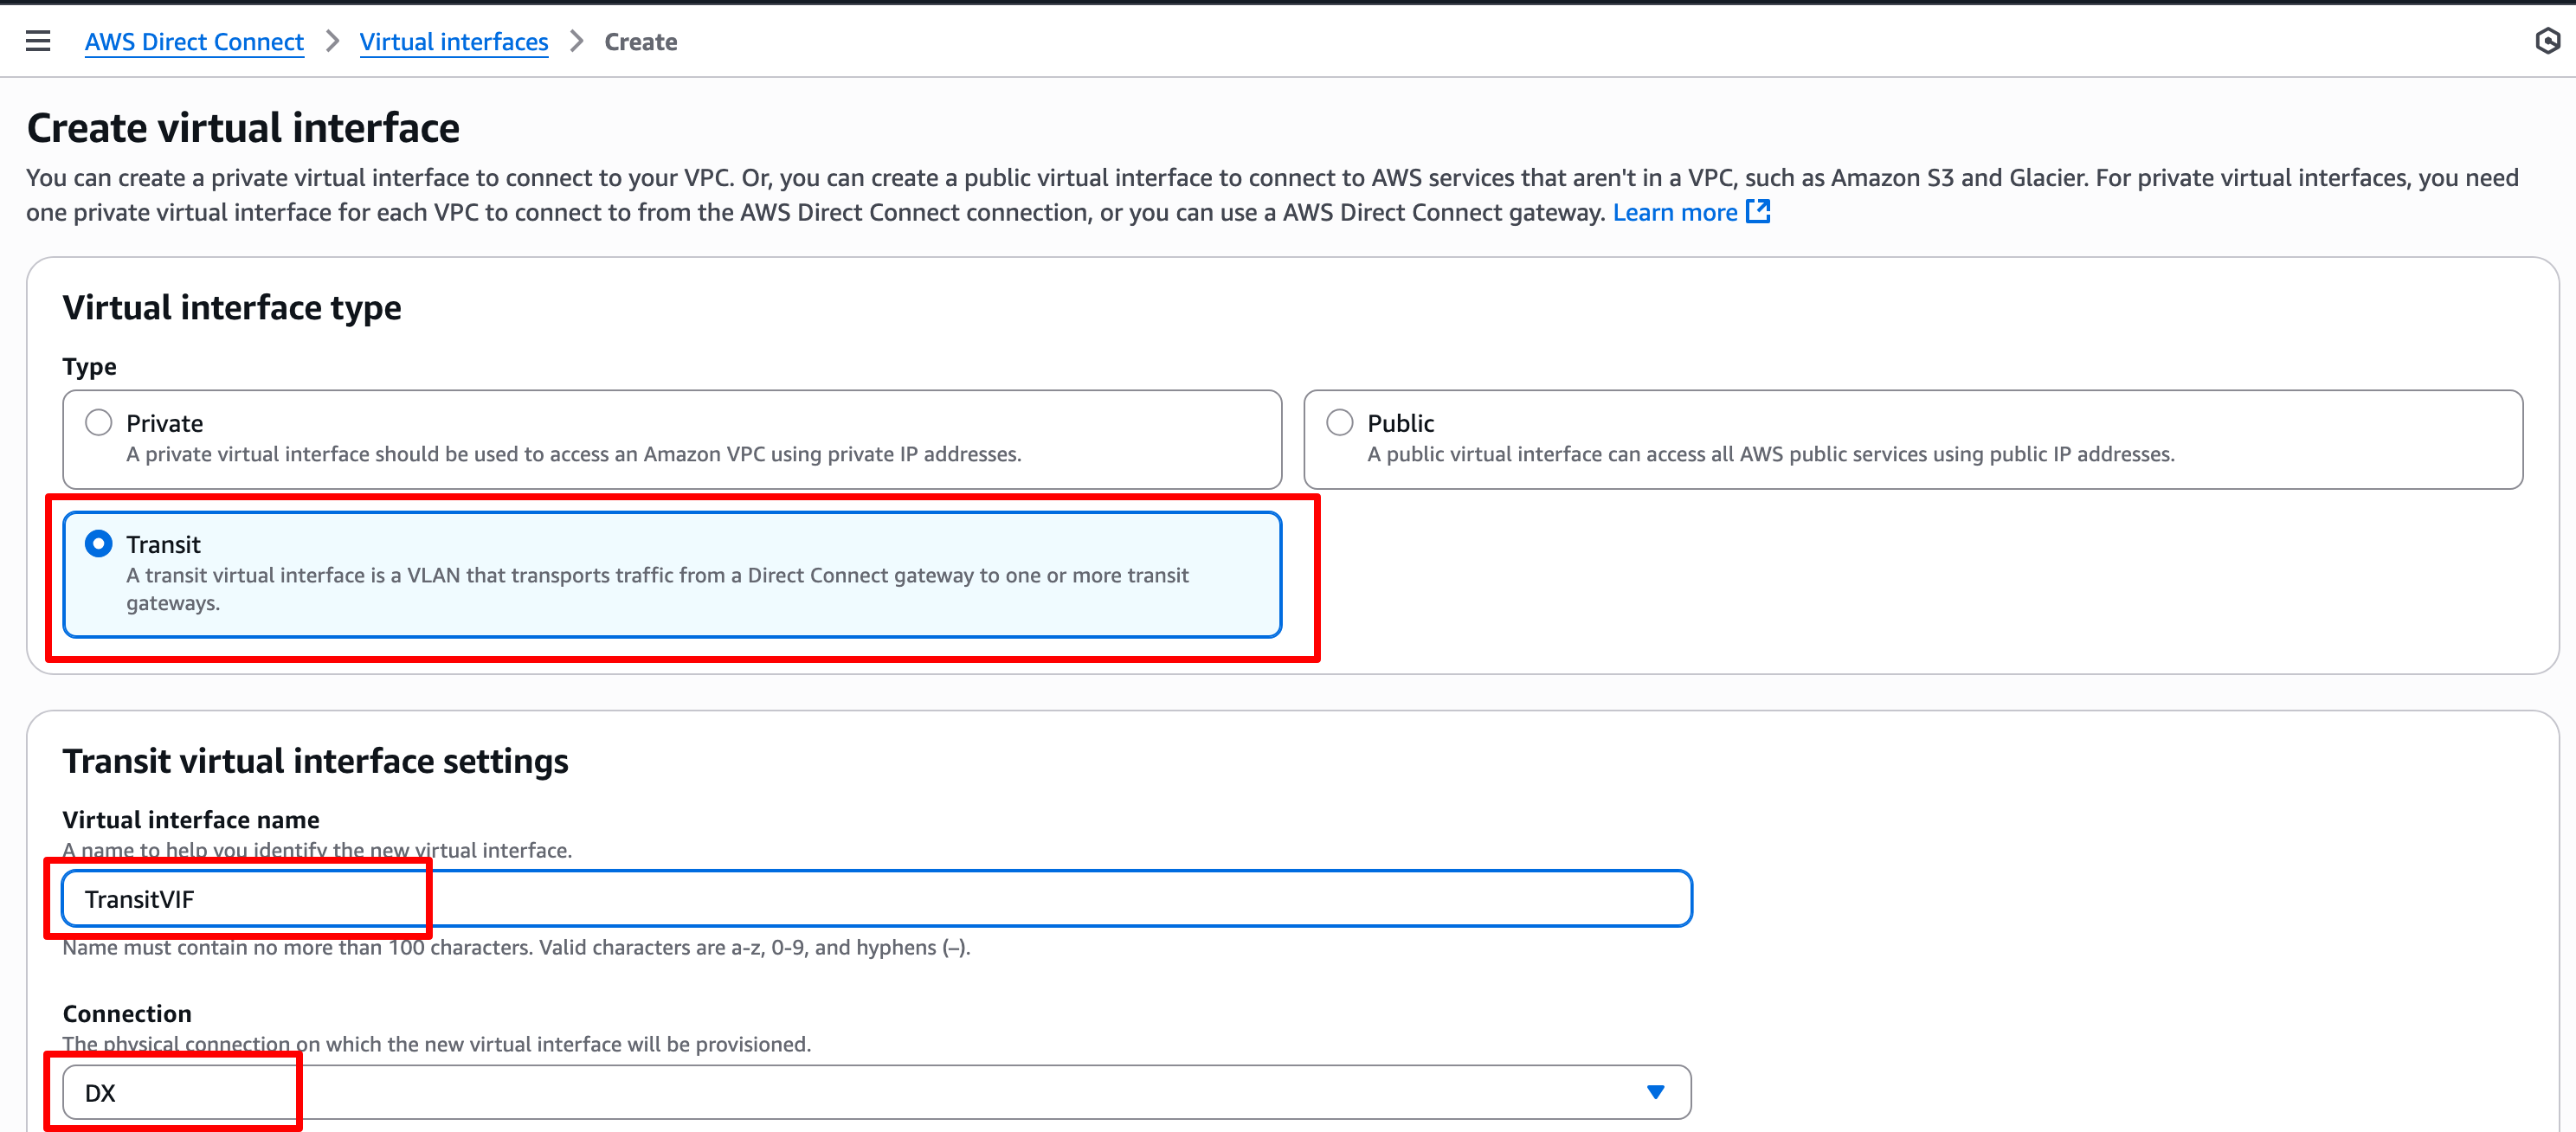
- Virtual interface type:Transit
- Virtual interface name:Transit VIF
- Connection:保持默认值
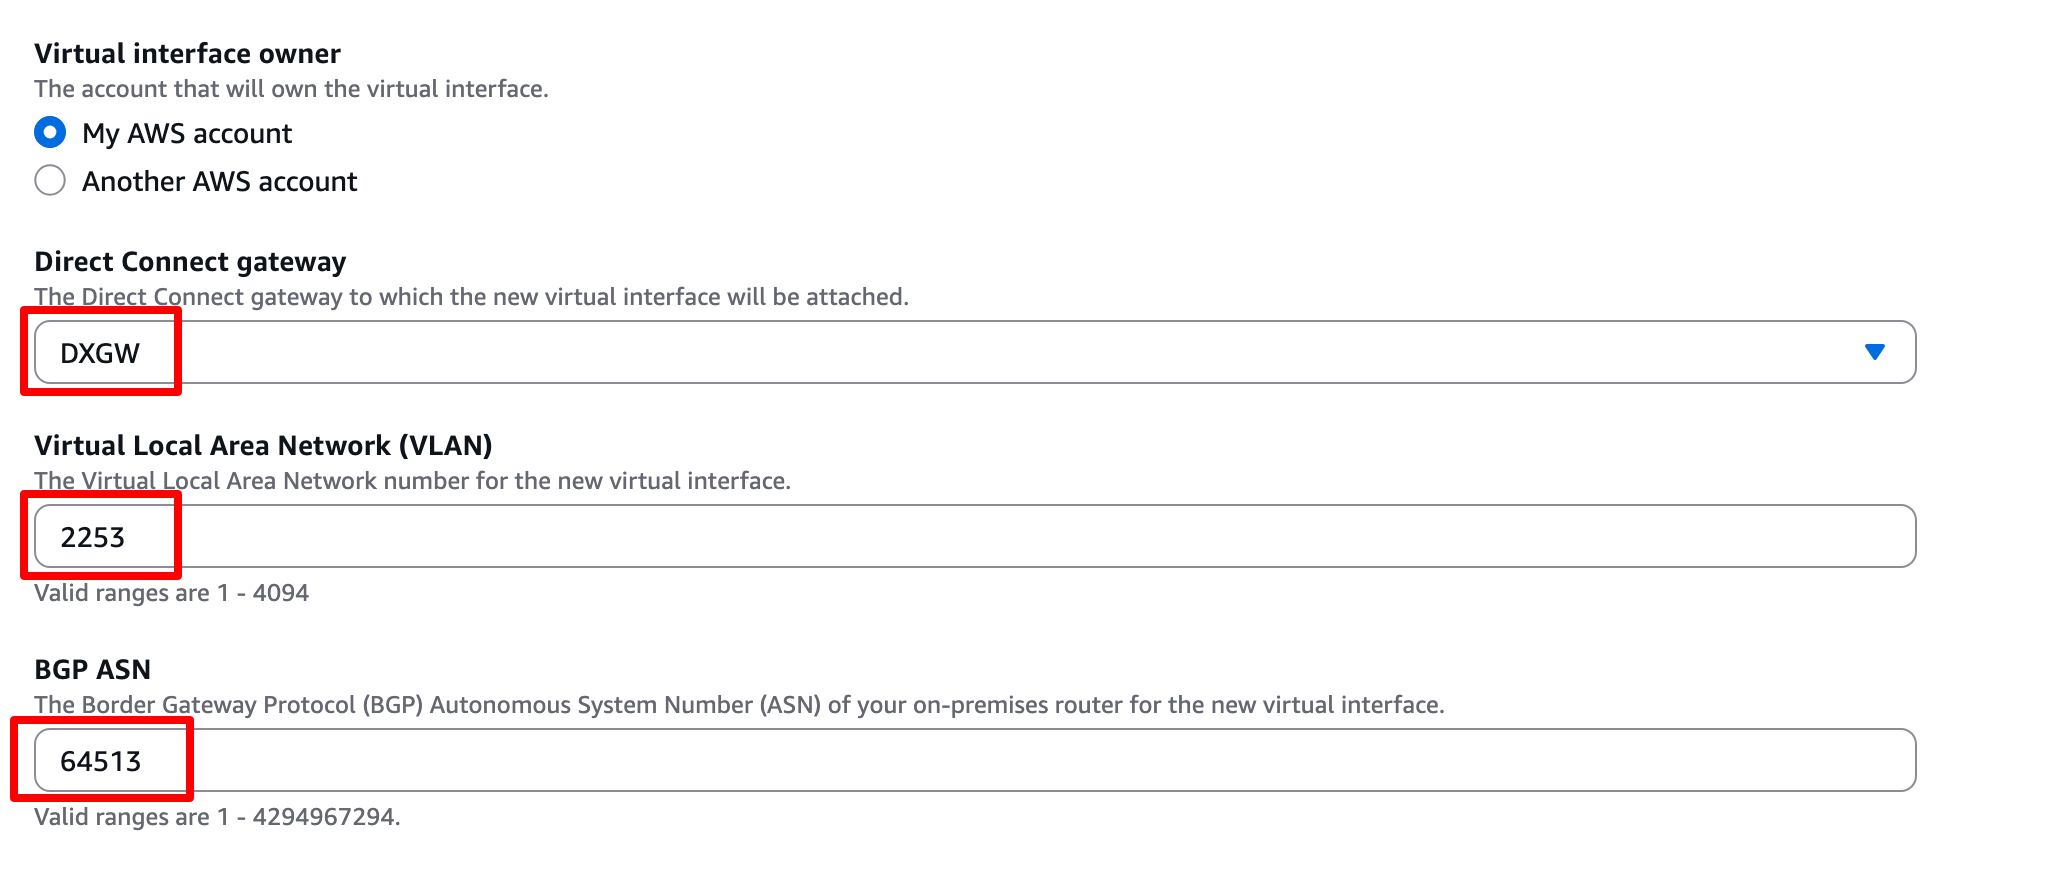
- Virtual interface owner:保持默认值
- Direct Connect gateway:从下拉菜单中选择 Direct Connect Gateway
- VLAN:保持默认值 - 如果未自动填充,请使用与订购门户中相同的 VLAN id
- BGP ASN:64513(或选择我们自己的,但必须与 DX Gateway 上指定的 ASN 不同)
点击 Additional Settings
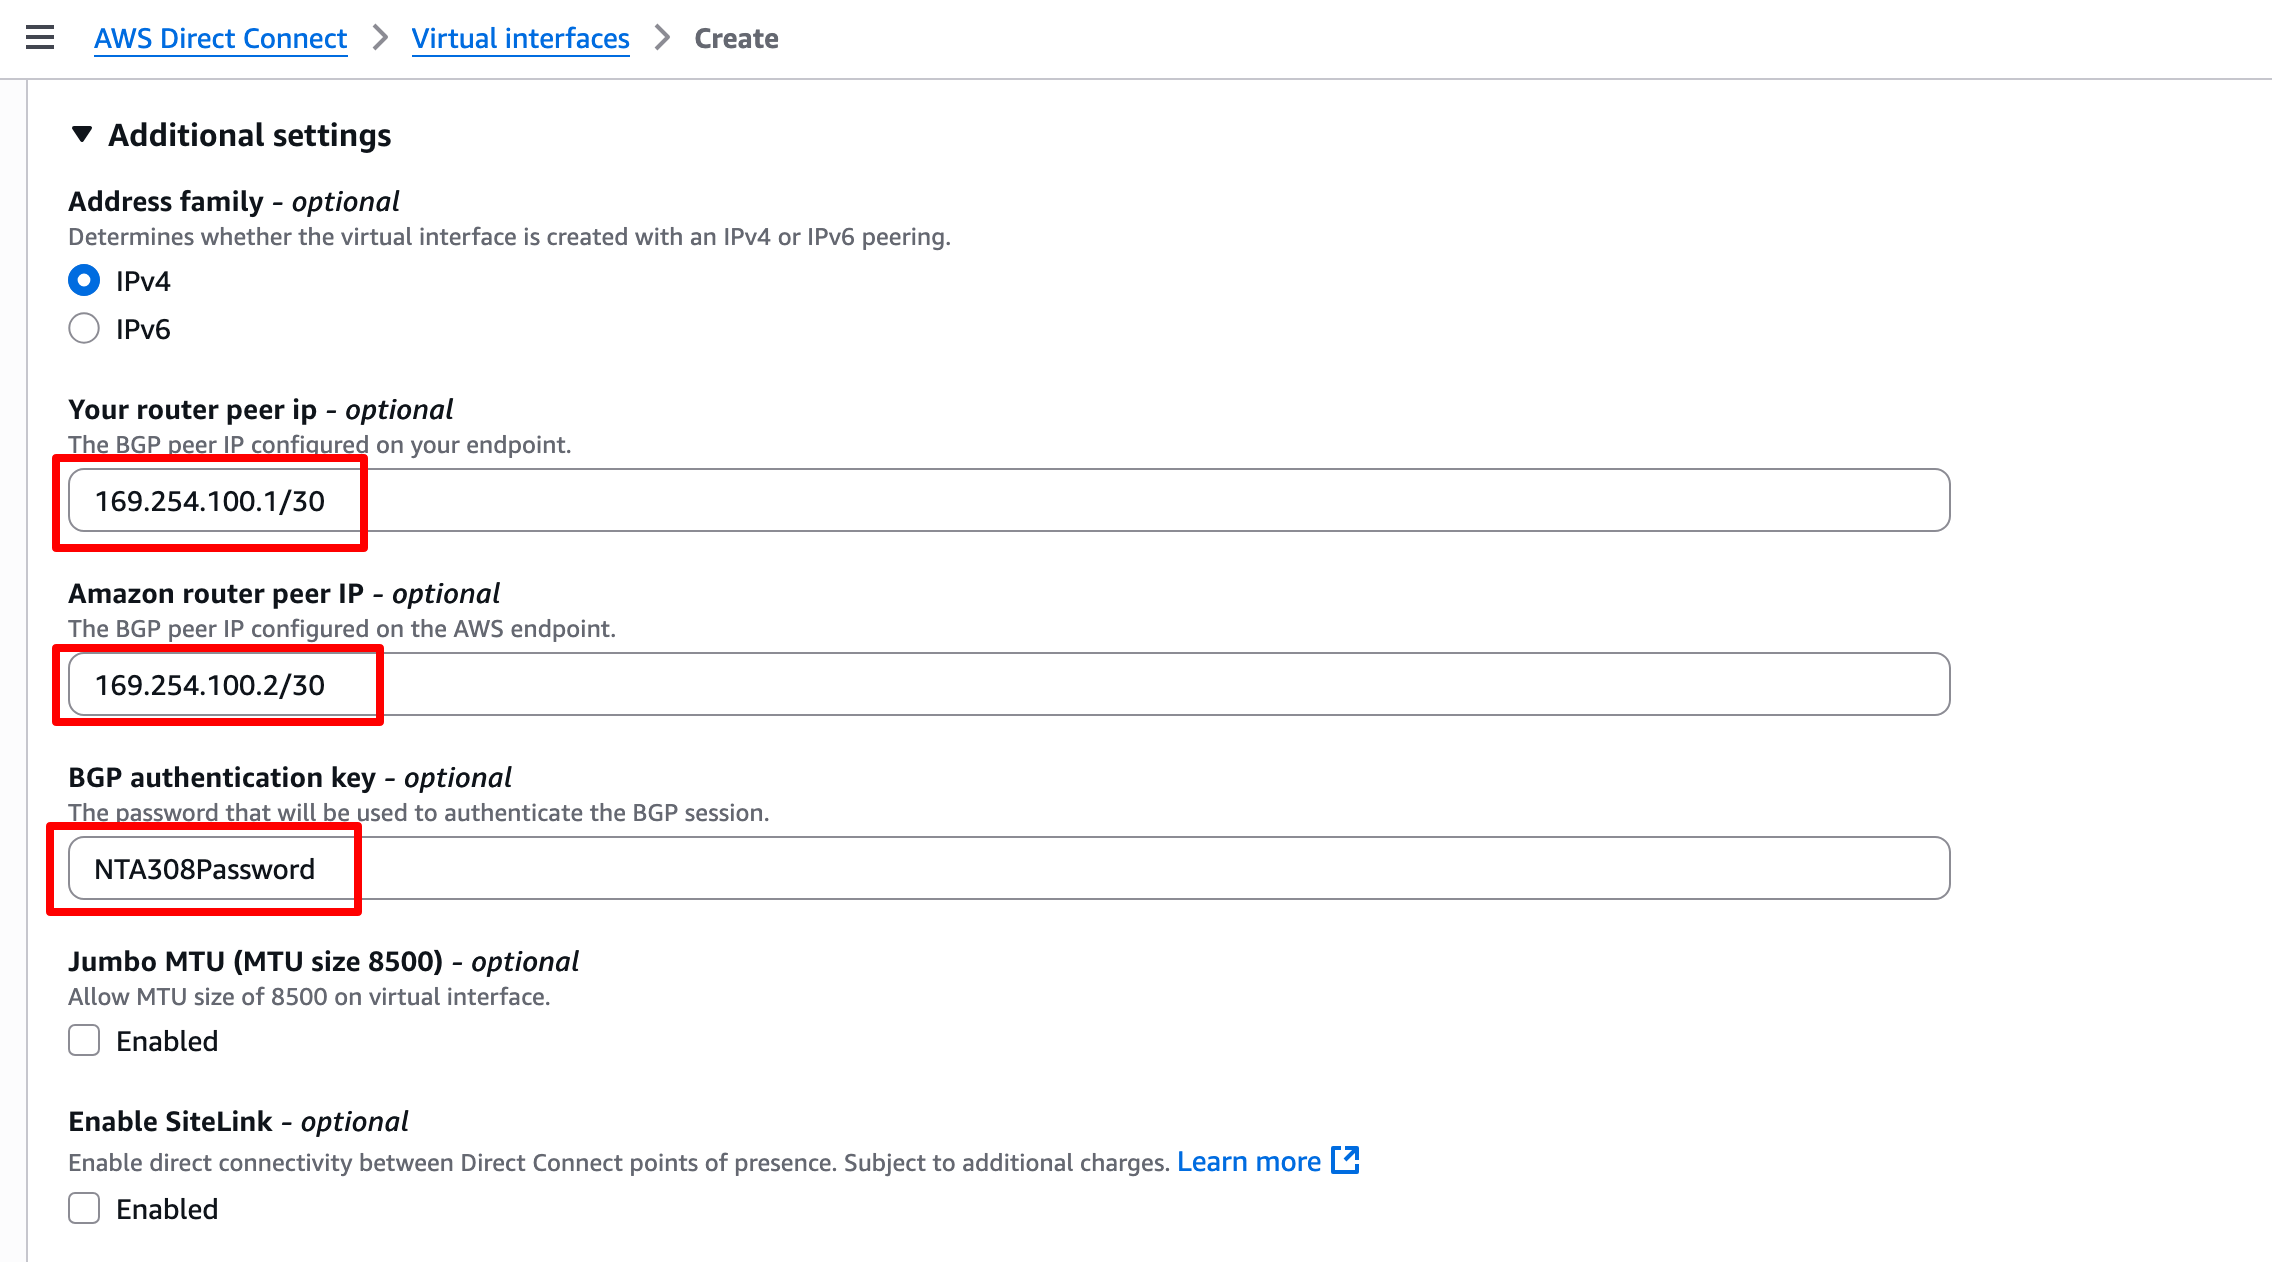
在很多情况下,我们可能希望指定要使用的 BGP 对等 IP 地址。如果我们不填写这些详细信息,系统将自动为我们生成。不过还是使用以下信息,这样在后面配置路由器命令的时候,就不用更改了:
- Your router peer ip:169.254.100.1/30
- Amazon router peer ip:169.254.100.2/30
- BGP authentication key:NTA308Password(或选择我们自己的)
- 其他所有选项保持默认值
最后进行创建。
创建完成后,点击VIF的 ID。我们将看到 BGP 状态为 Down。接下来我们将配置本地路由器并建立 BGP:
配置BGP会话
边界网关协议,通常称为BGP,是一种在网络之间交换路由的方法,BGP是使用Direct Connect的必要条件。
登录到router设备。
admin@router:~$
我们现在开始配置路由器, 该路由器有3个网络接口:
- eth0: 互联网
- eth1: Direct Connect
- eth2: 局域网
输入show interfaces并按[Enter]。我们将看到以下接口列表。eth1是我们将为Direct Connect配置的接口。

在路由器终端输入 configure 并按 [Enter] 进入配置模式。我们现在将看到带有#的提示符。
admin@router$ configure
[edit]
admin@router#
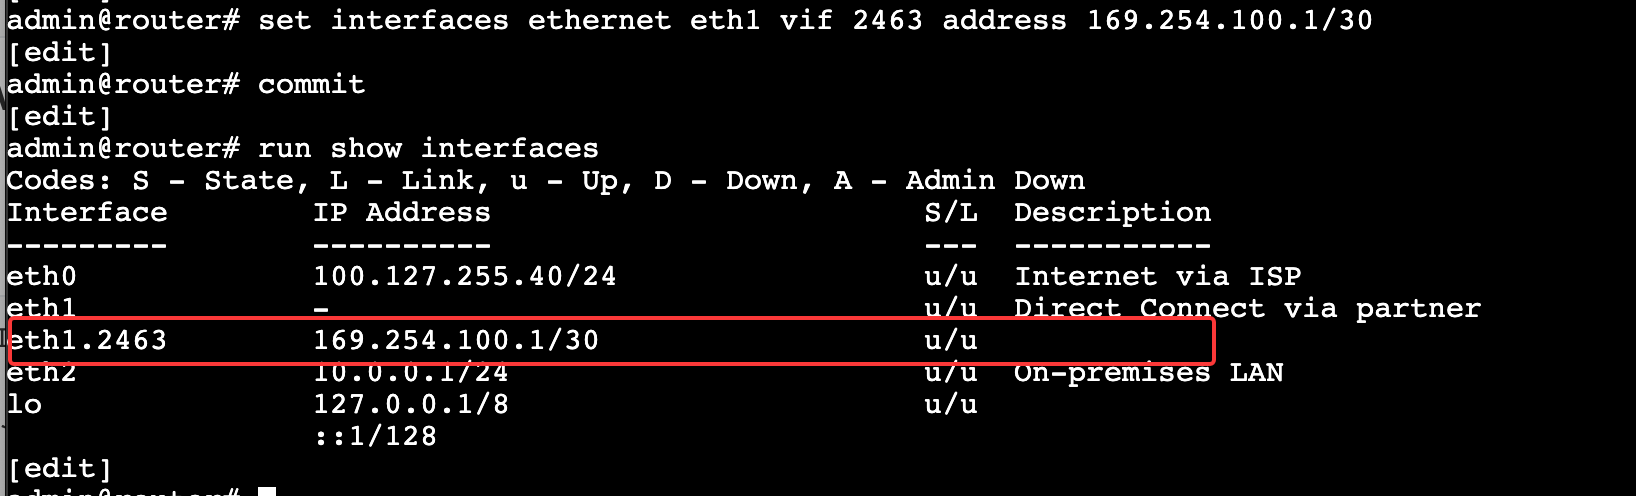
接下来,我们将为eth1上的子接口设置IP地址。将 VLANID 替换为订购Direct Connect时使用的相同VLAN ID。运行以下命令设置子接口IP地址并提交配置。
- 将里面的
169.254.100.1替换成上面图中的Your router peer IP
# 将 **VLANID** 替换为订购连接时指定的VLAN ID

set interfaces ethernet eth1 vif `VLANID` address 169.254.100.1/30
commit
输入 run show interfaces 并按 [Enter]。我们现在可以看到我们的eth1接口上有一个带有VLAN和IP地址的子接口。
输入以下命令,这些命令将设置BGP,包括指定我们的本地AS编号,通告我们的本地网络 10.0.0.0/24,以及将Direct Connect Gateway定义为BGP邻居。
set protocols bgp 64513 parameters router-id 169.254.100.1
set protocols bgp 64513 address-family ipv4-unicast network 10.0.0.0/24
set protocols bgp 64513 neighbor 169.254.100.2 remote-as 64512
set protocols bgp 64513 neighbor 169.254.100.2 password NTA308Password
set protocols bgp 64513 neighbor 169.254.100.2 address-family ipv4-unicast
set protocols bgp 64513 neighbor 169.254.100.2 solo
set protocols bgp 64513 neighbor 169.254.100.2 bfd
set protocols bfd peer 169.254.100.2
commit
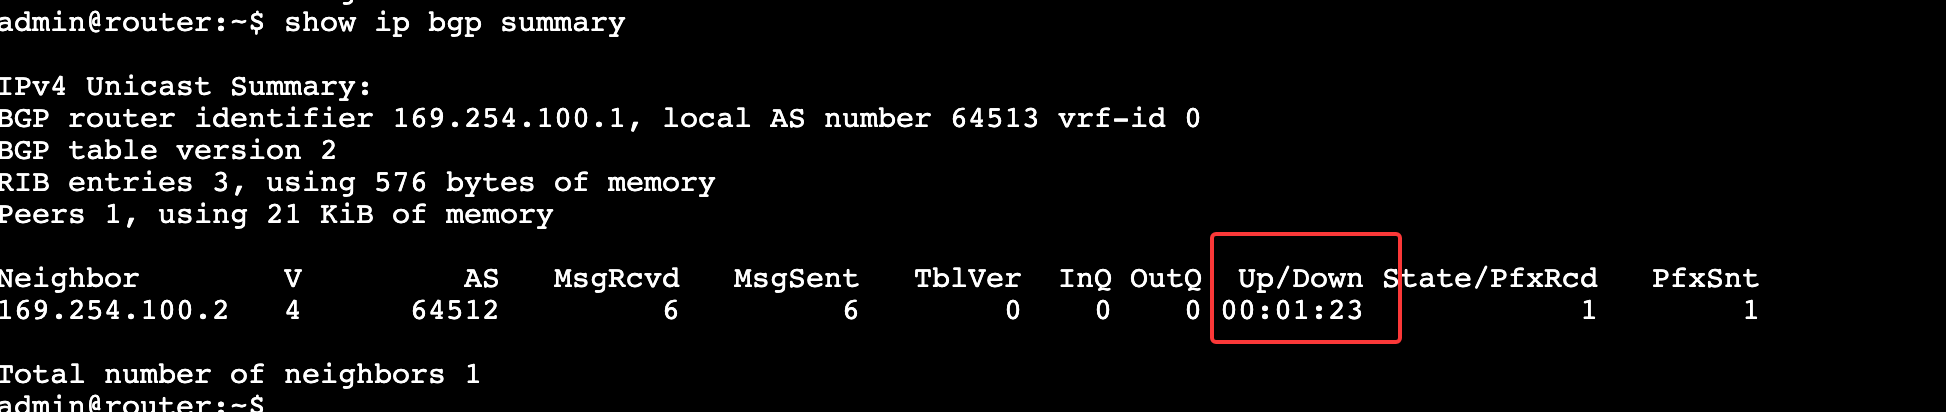
输入 exit 并按 [Enter] 退出配置模式。输入 show ip bgp summary 验证连接和当前状态。我们应该能够看到列出的邻居,Up/Down显示连接已建立的时间。
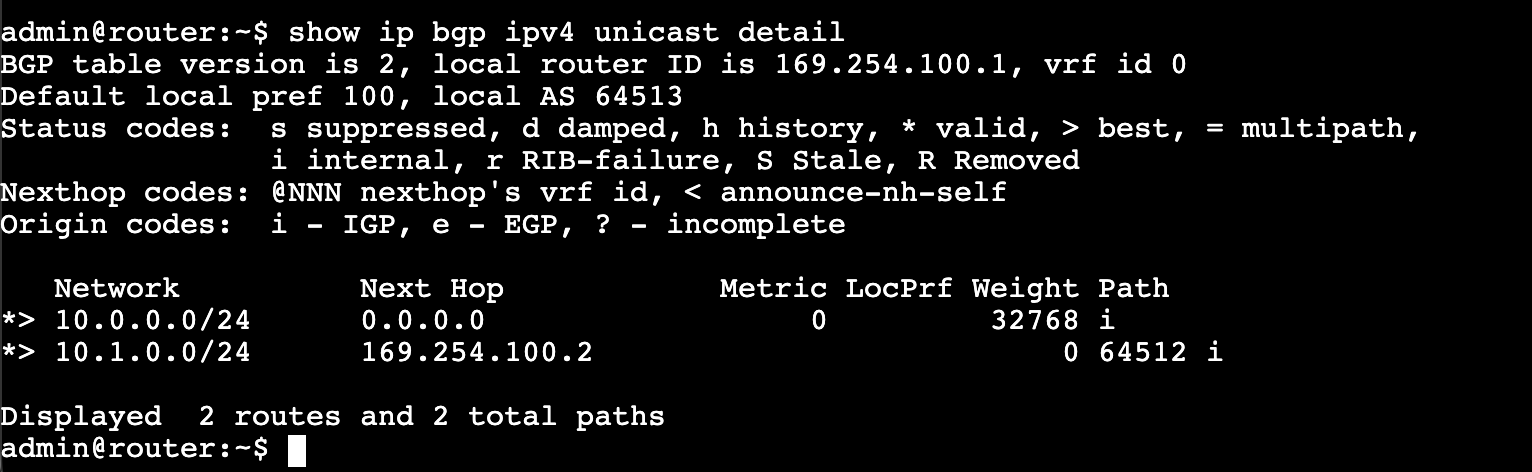
如果我们想查看接收的路由,请输入 show ip bgp ipv4 unicast detail并按 [Enter]。
完成此步骤后,我们已成功设置Direct Connect连接。
测试 Direct Connect 连通性
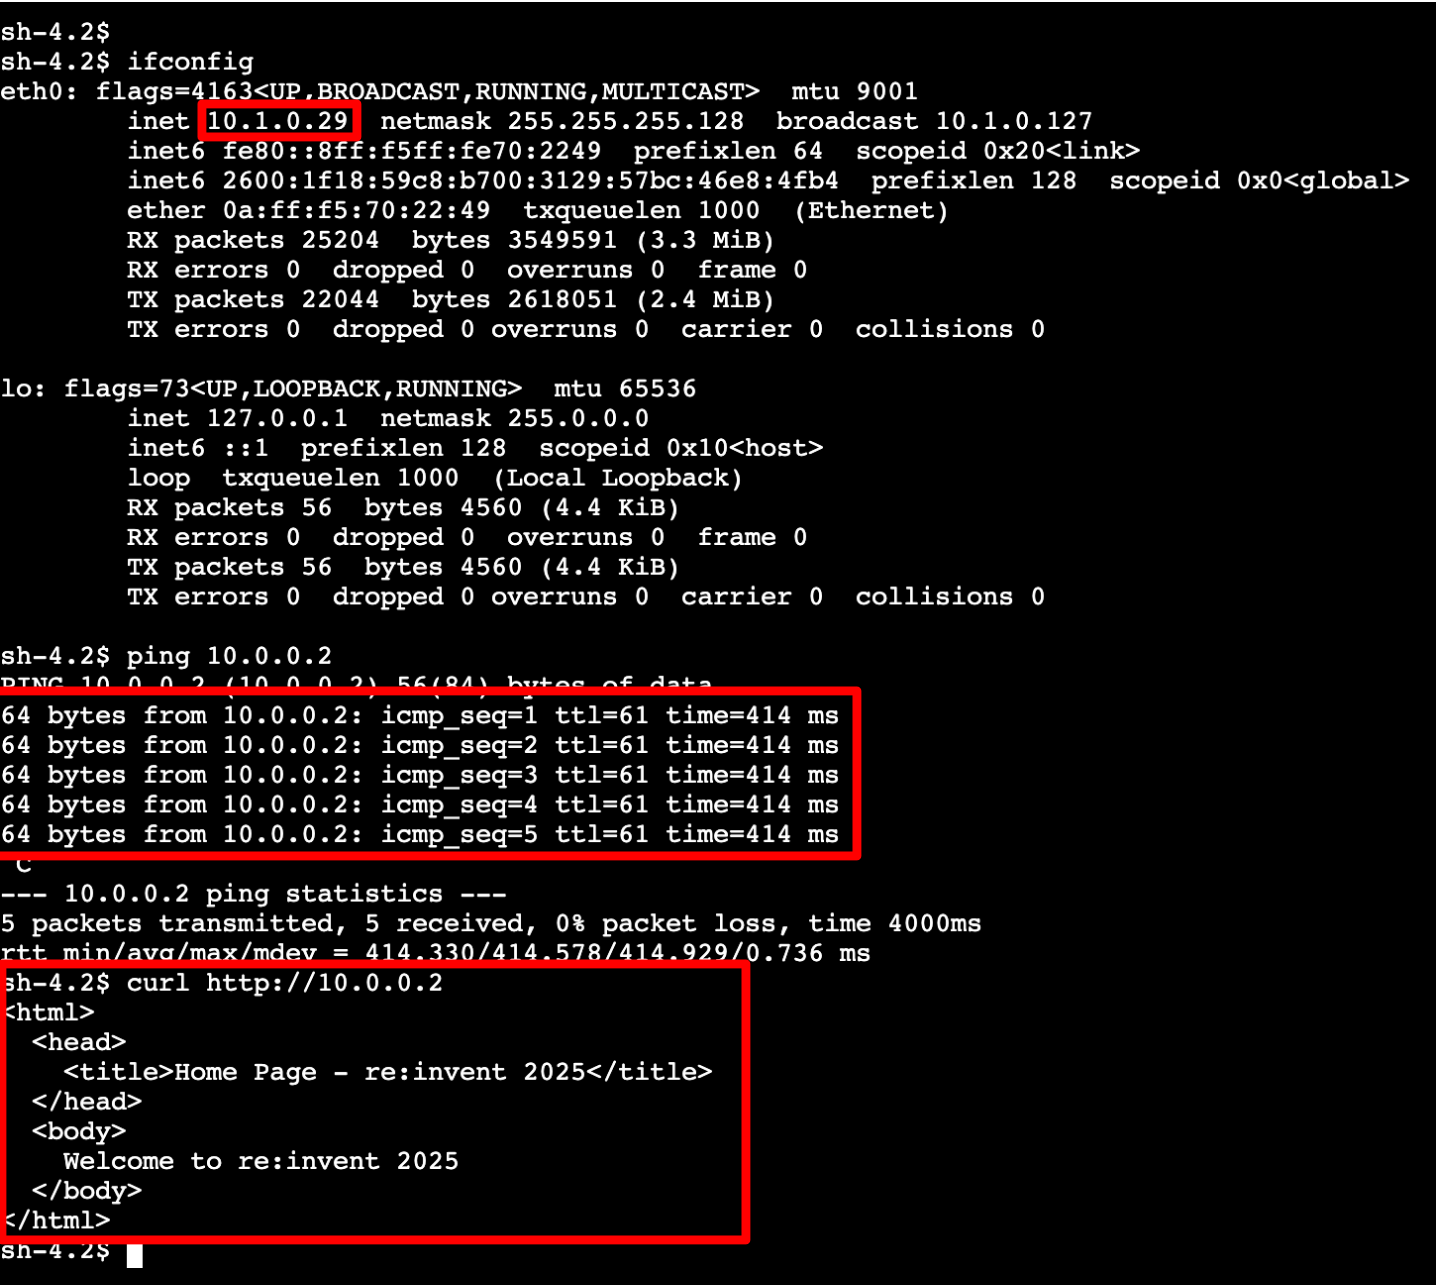
为了验证 AWS 和模拟本地环境之间通过 Direct Connect (DX) 的连通性,我们将使用 Bastion-Host EC2 实例来访问位于我们在上一步中使用 BGP 配置的本地路由器后面的on-prem Web 服务器。Web 服务器 IP 为 10.0.0.2。
在测试连通性之前,让我们完成最后一步,在 Central VPC 路由表中添加指向 Transit Gateway 的on-prem LAN 10.0.0.0/24 路由。
在 Central VPC 路由表中添加 LAN 路由
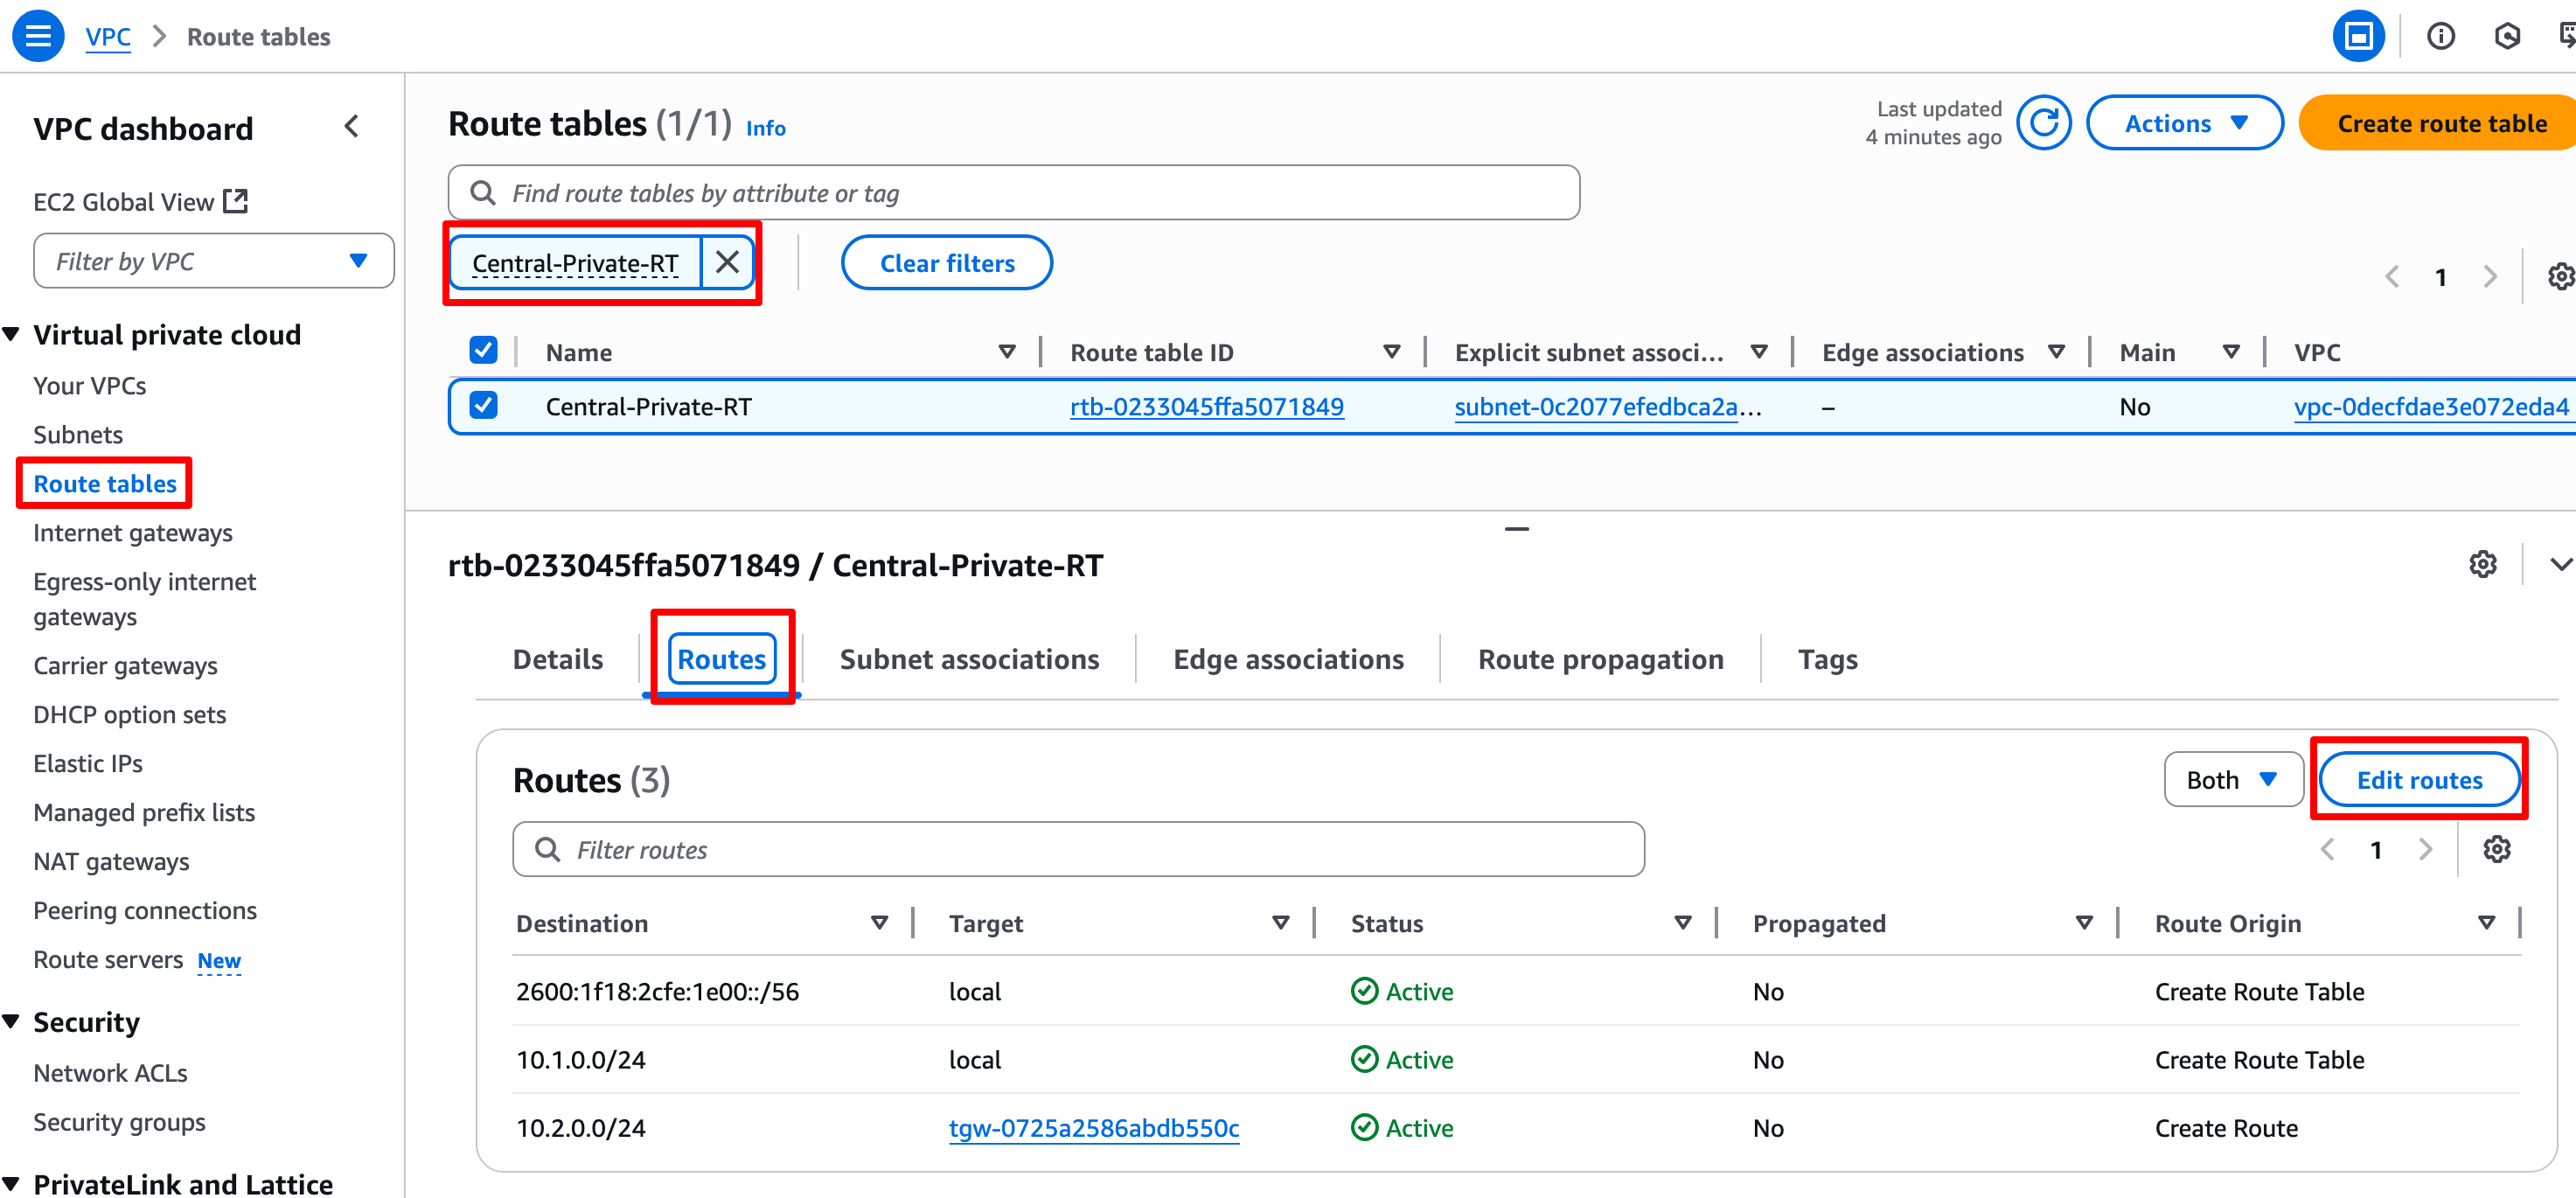
- 打开 VPC Console,从侧边菜单中选择 Route Tables。
- 选中 Central-Private-RT 路由表的复选框,向下滚动选择 Routes 选项卡,然后点击 Edit routes。
-
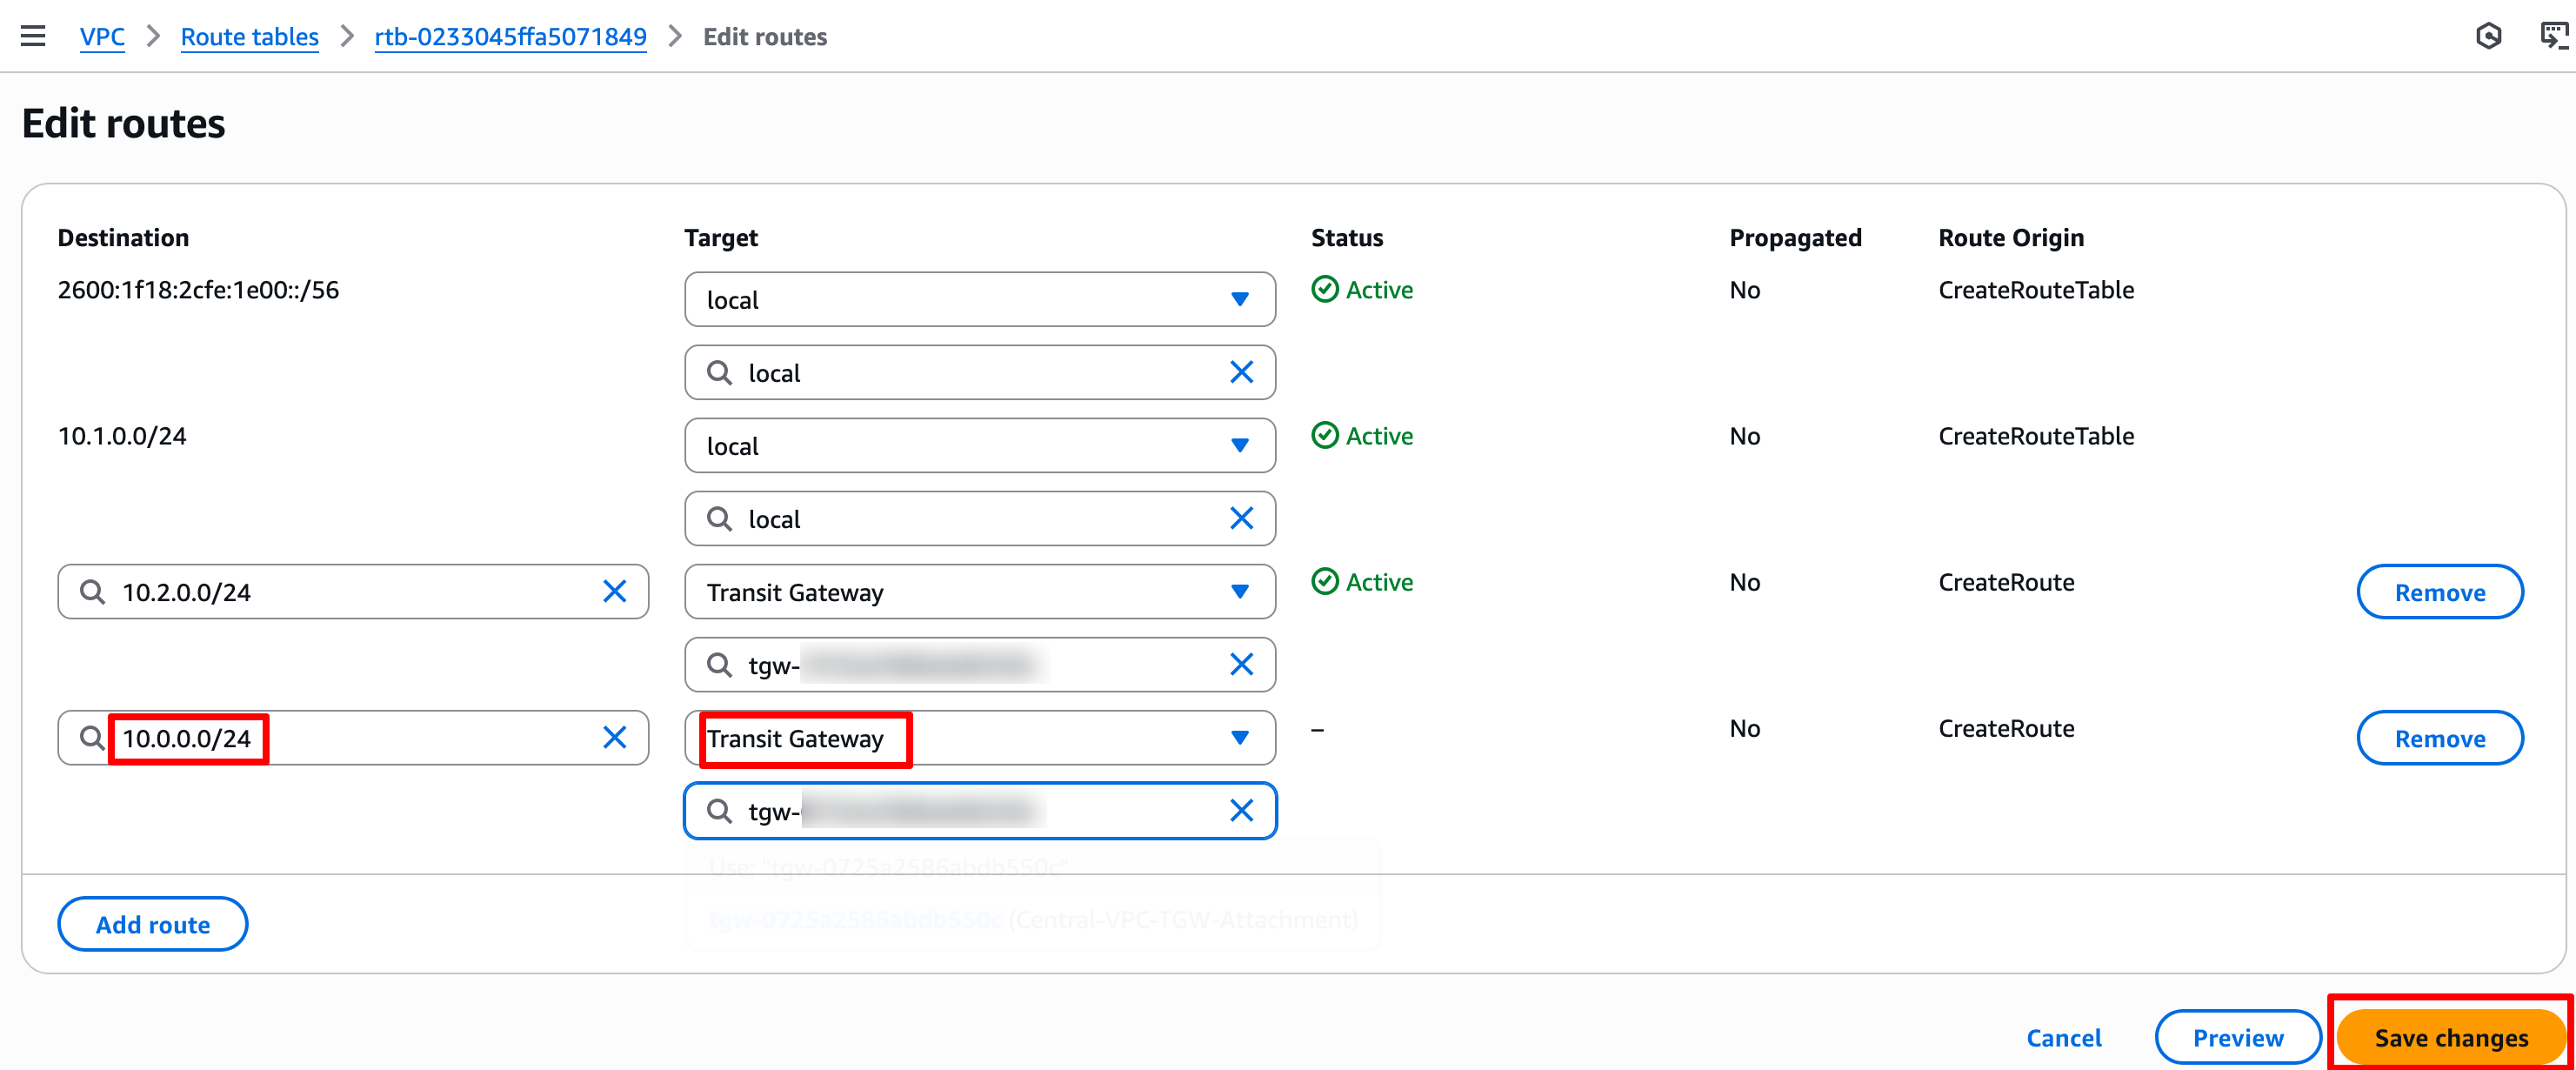
在 Central VPC 私有路由表中,使用 Transit Gateway(TGW Central VPC Attachment)作为目标,添加到本地 LAN 10.0.0.0/24 的路由。
-
点击 Save routes。
测试 Direct Connect 连通性
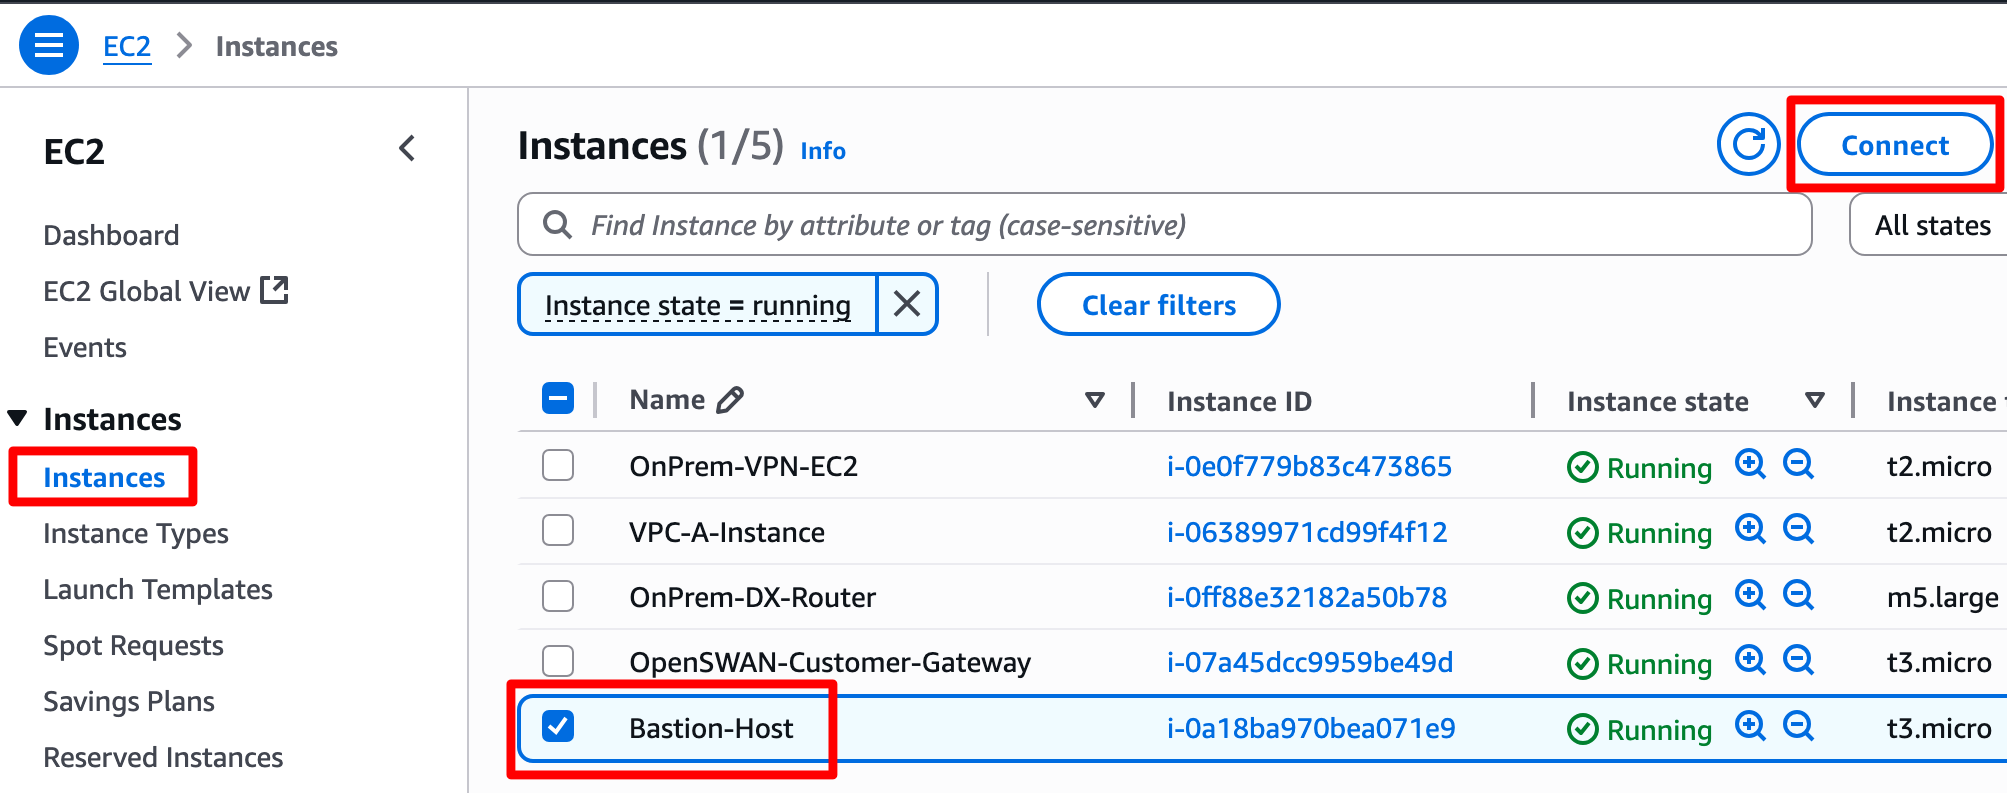
- 打开 EC2 Console,从侧边菜单中选择 Instances。
- 点击 Bastion-Host 实例,然后点击 Connect 按钮。
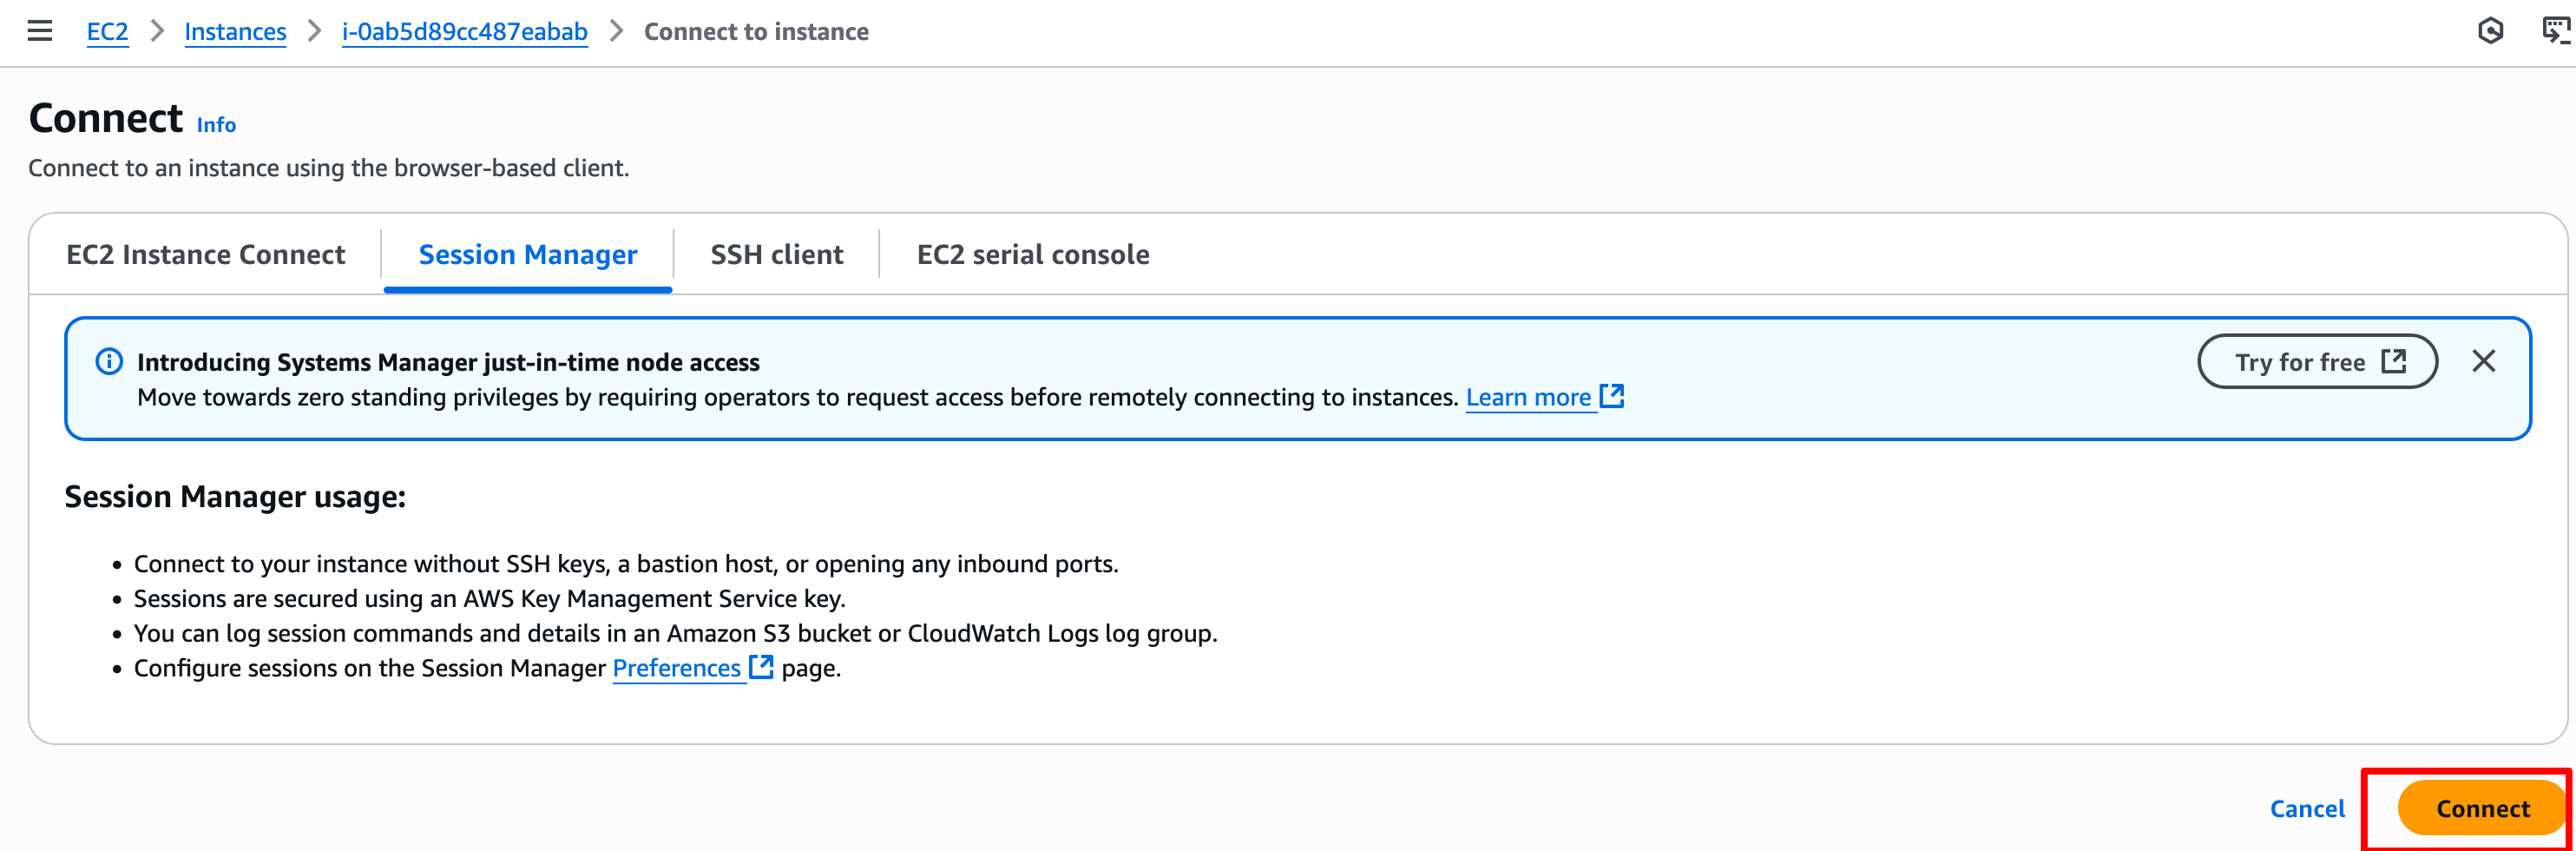
- 在连接到实例页面中,选择 Session Manager 选项卡,然后点击 Connect 按钮。
- 会话打开后,执行
ping 10.0.0.2和curl http://10.0.0.2以确认通过 Direct Connect 的连通性正常工作。